


This is the Day 27 of the #90DaysofDevOps in which we'll be deep diving into more Jenkins Pipeline and how to create Jenkinsfile that will create Docker containers and docker images.
As I discussed in my previous blog (Day 26) about simple Jenkinsfile that prints the hello-world from the definition of Pipeline Script. In today's blog, we'll be writing Jenkinsfile in VS Code and pushing it to the repository that will automatically trigger the pipeline and start building.
Firstly you had to know about the commands for Docker containers and Docker Images so for this refer to this blog. (https://hashnode.com/post/cldqc1kei000209l61gr27dp8)
Task 1:
Create a docker-integrated Jenkins declarative pipeline.
Write the declarative pipeline syntax by using
shinside the stage block.
Steps:
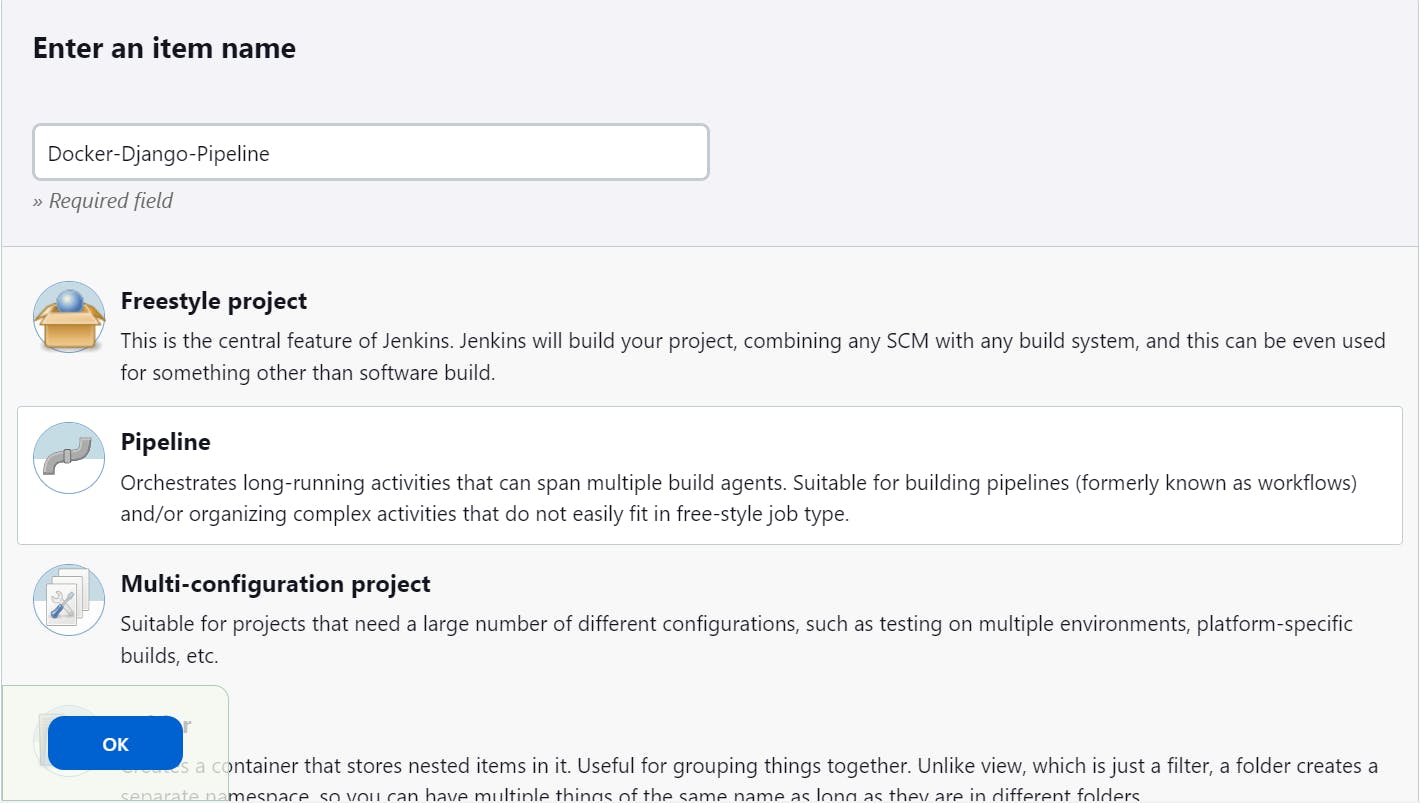
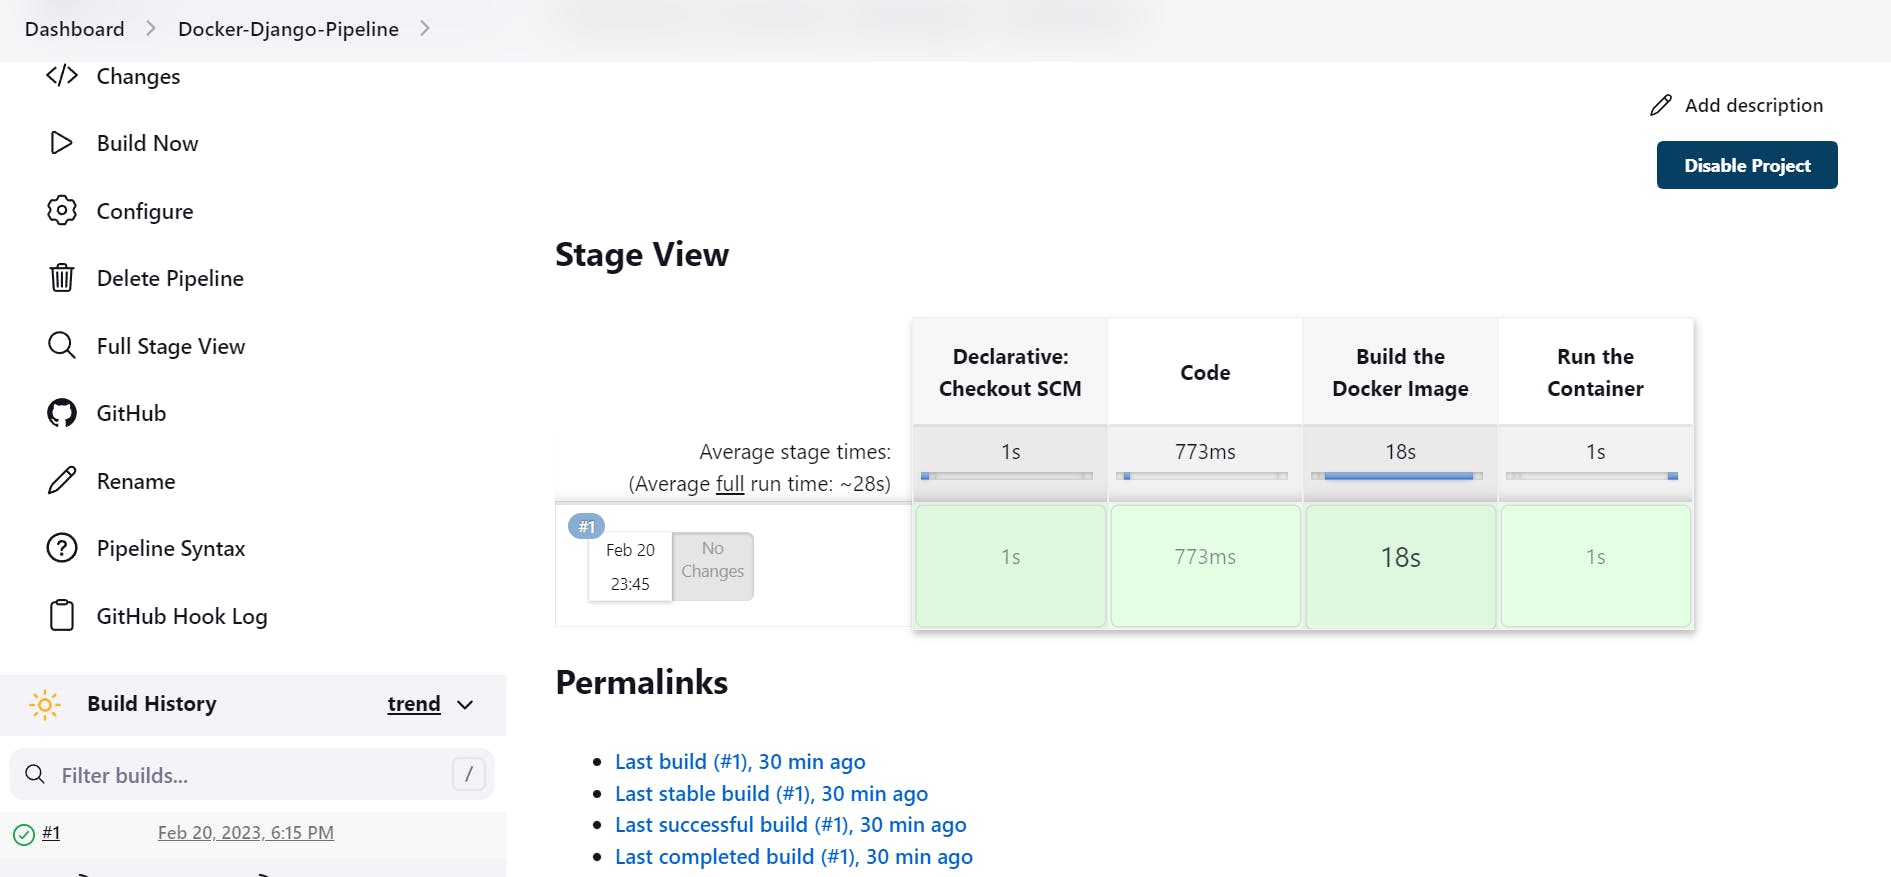
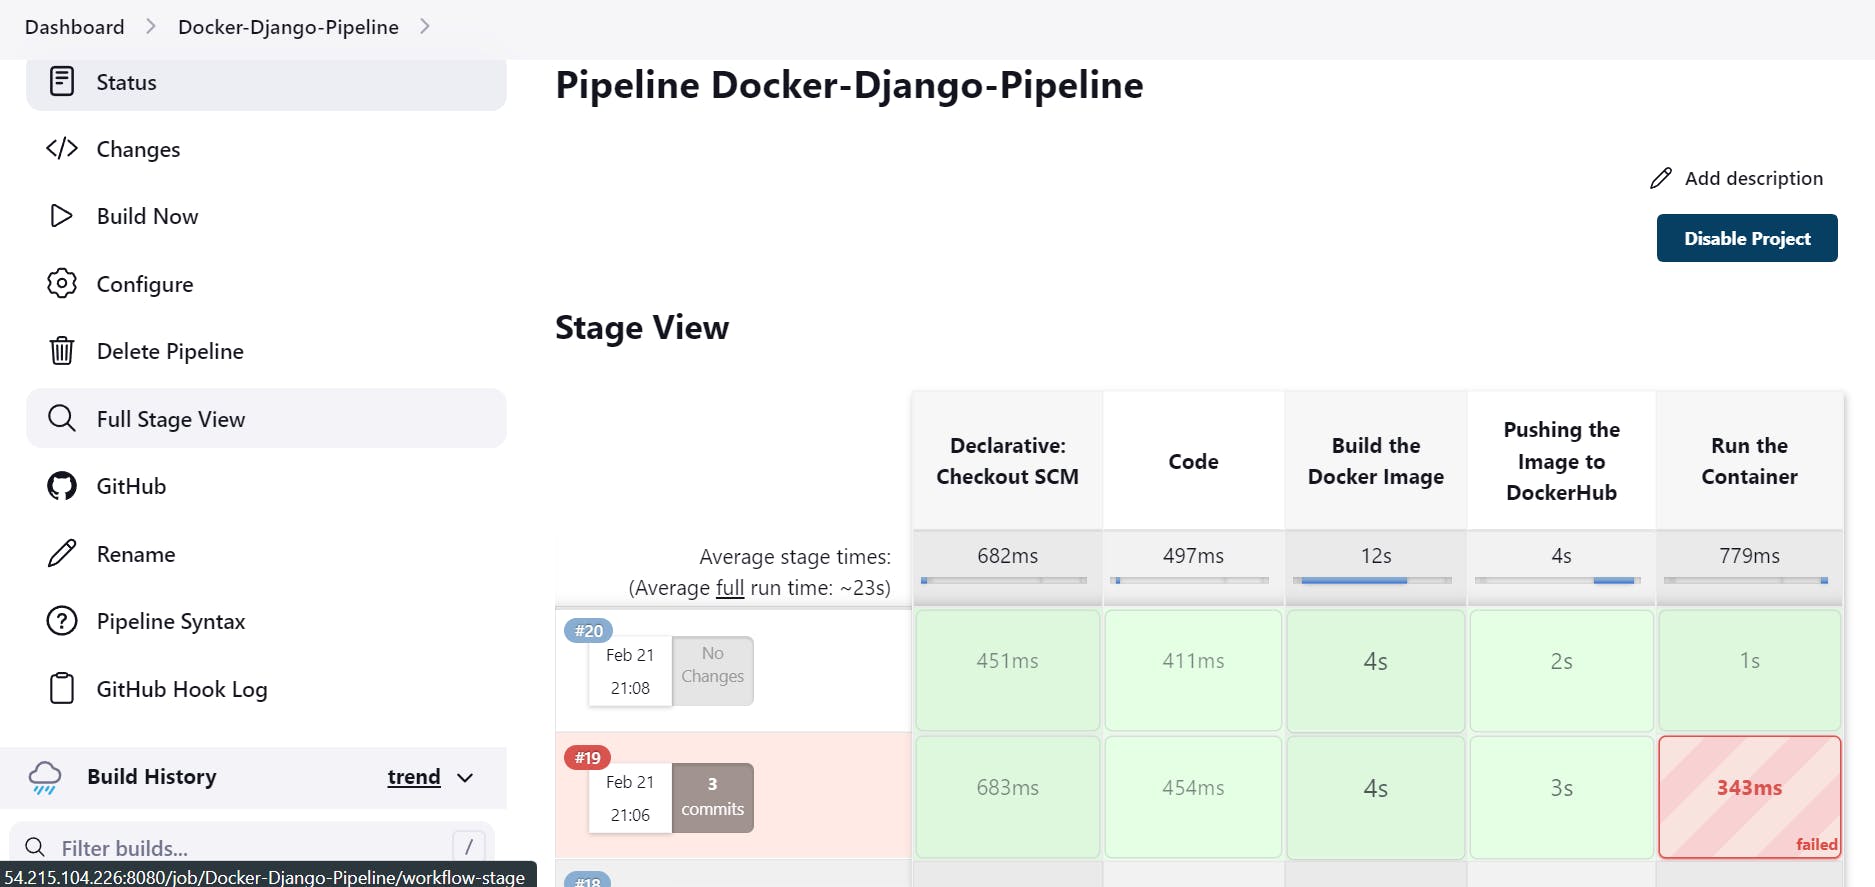
Create a new Jenkins Job Docker-Django-Pipeline (New Item) and select Pipeline.
Under General, give the GitHub Project URL under GitHub Project.
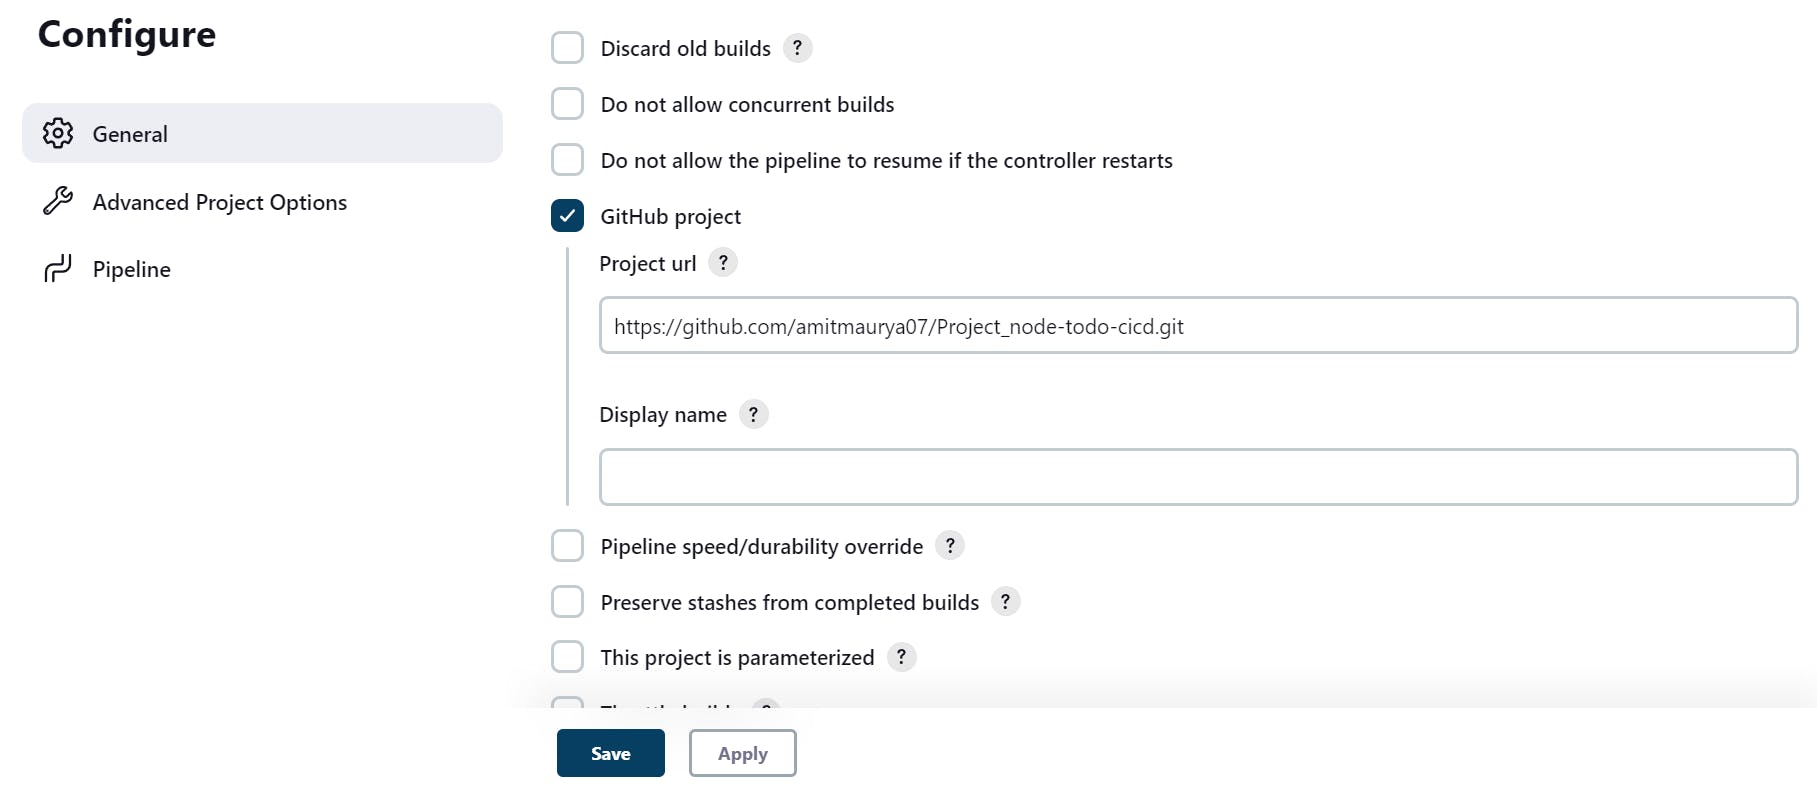
Then go to Build Trigger and click on GitHub Hook Trigger for GitSCM Polling. Remember this job will be triggered when you had created the Webhook. (You can see in Day 24 Blog about Webhooks)

WEBHOOK :
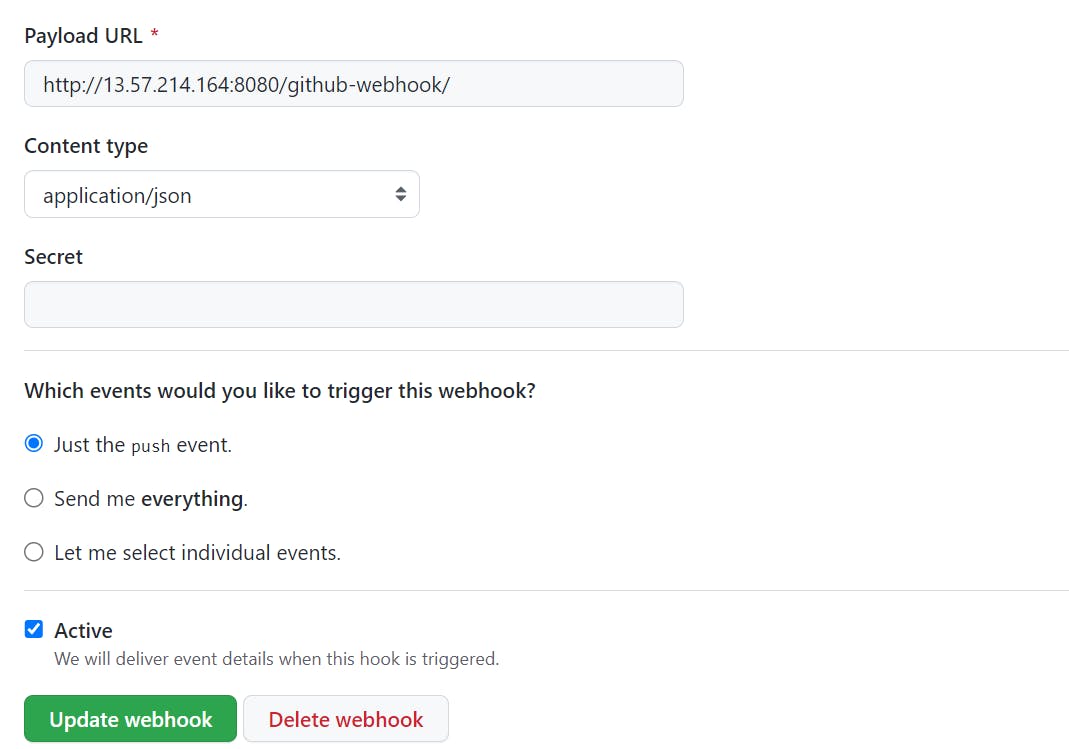

When you see the green tick that means it is pingable and the webhook is successfully created.
Go to Pipeline Section and under the definition select Pipeline Script from SCM which means Jenkins will pick up the Jenkinsfile from Git Repository. Remember the name of the Jenkinsfile will be as it is.
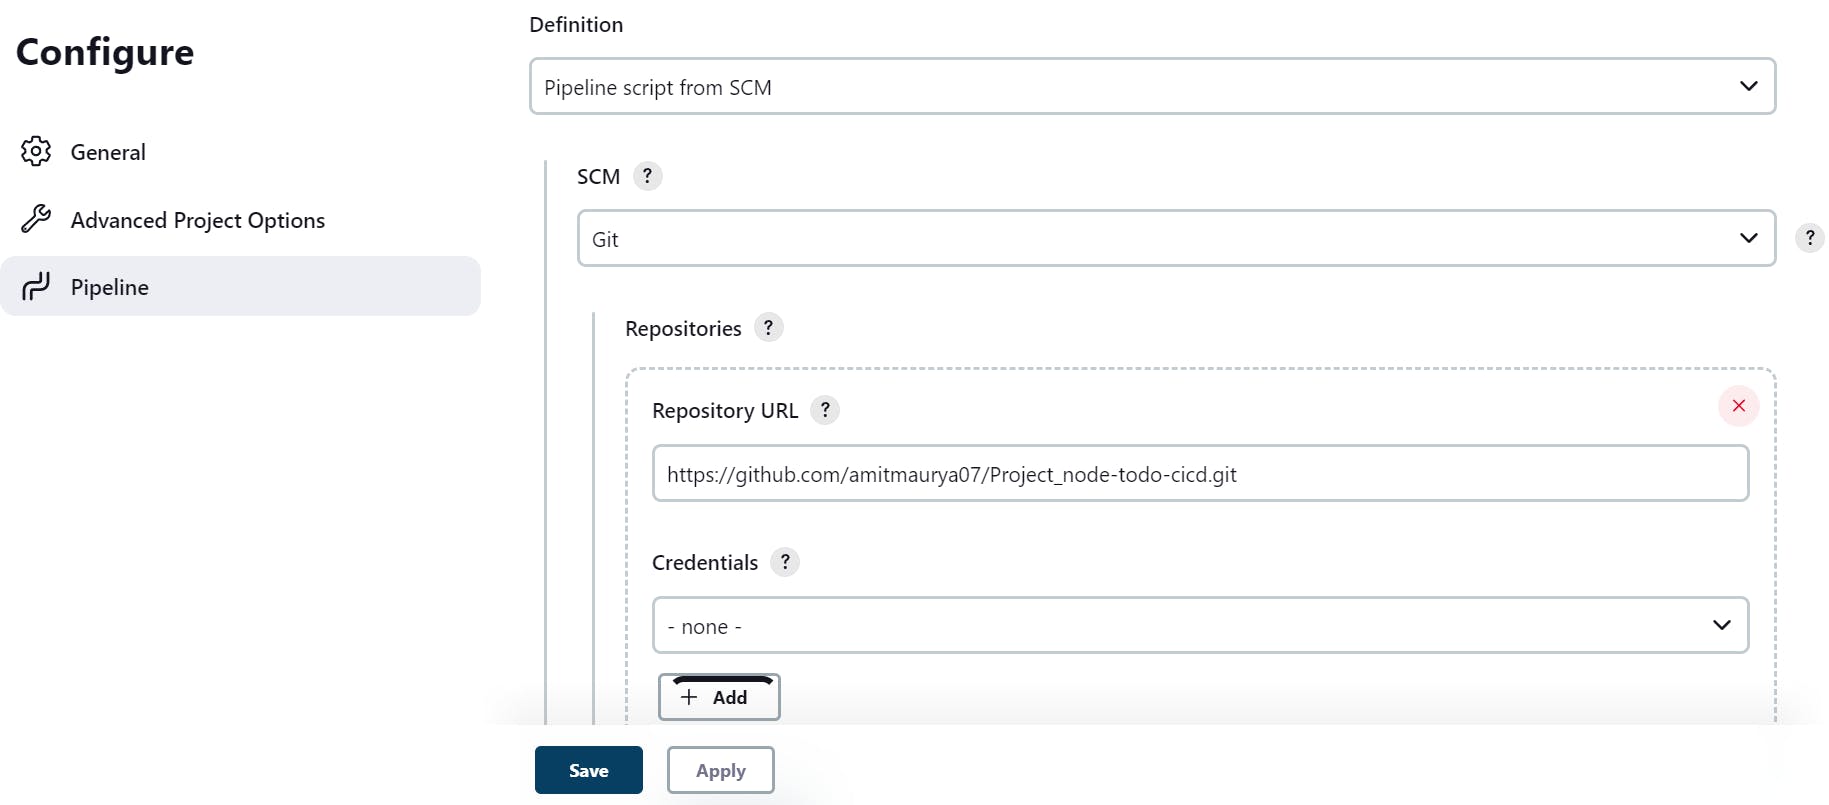
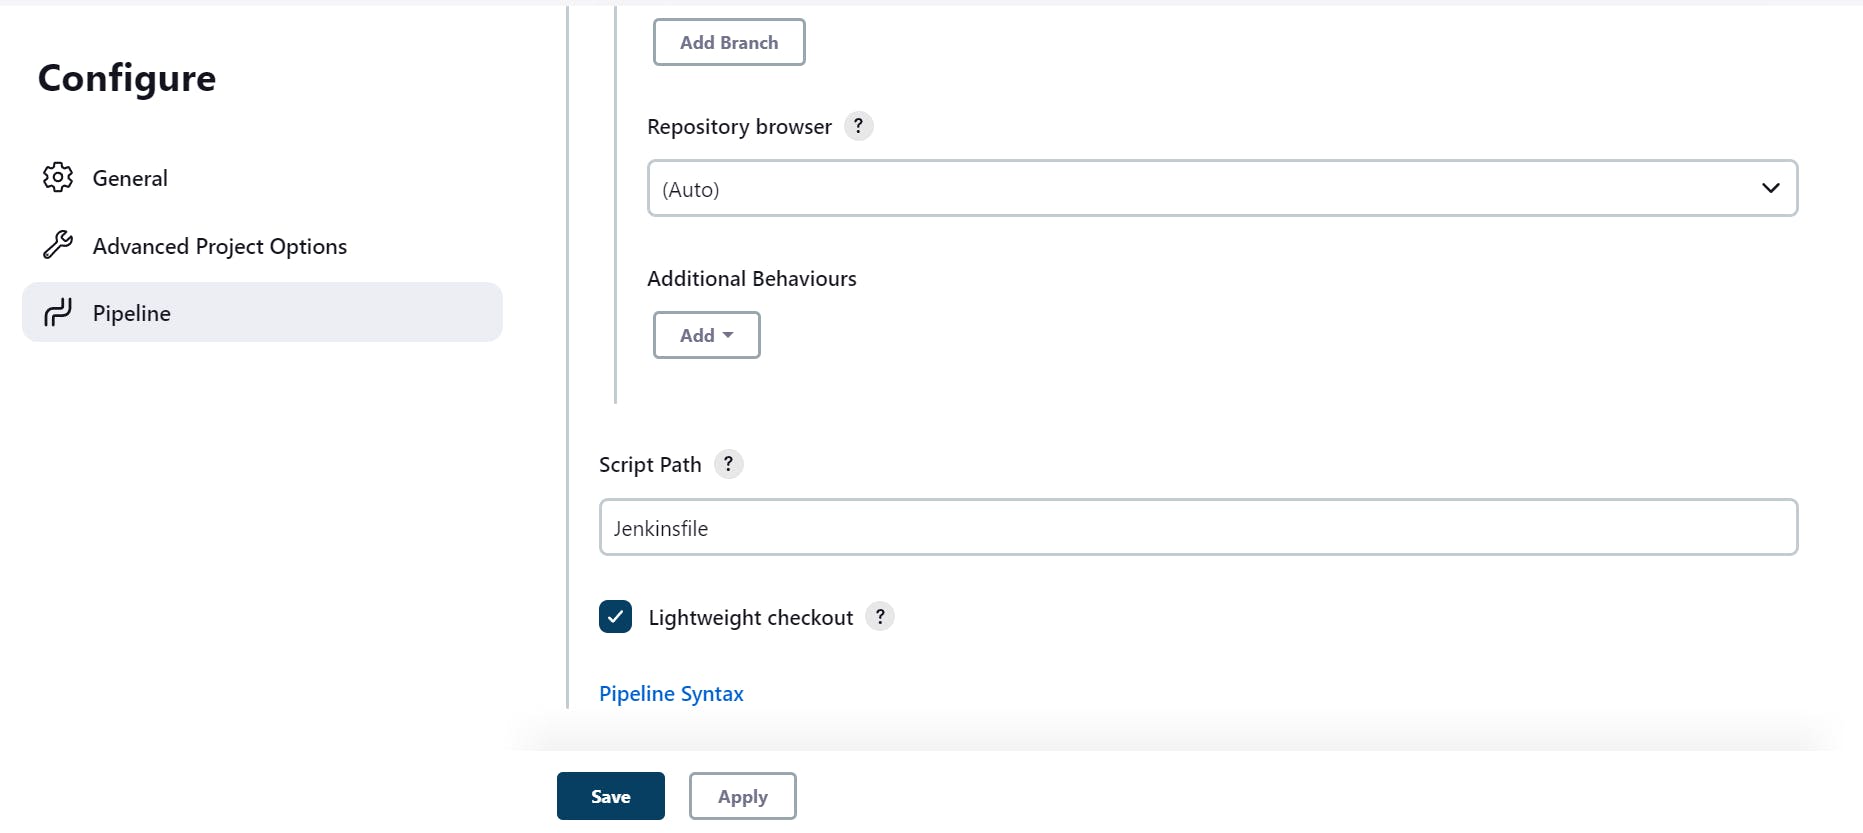
Under SCM select Git and provide the repository URL and give the branch specifier name and the script path will be Jenkinsfile. Now click on Apply and Save.
How to write Jenkinsfile?
Now clone the same repository into your local machine.
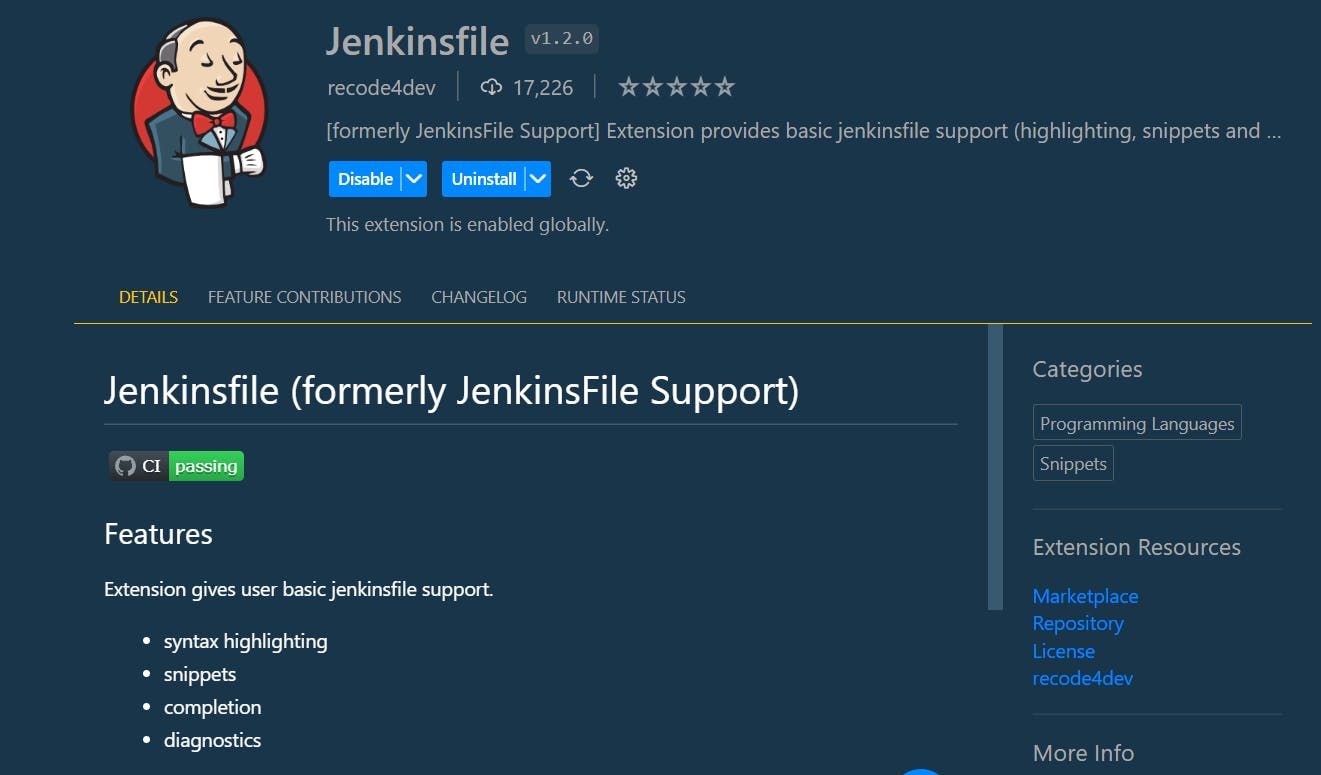
Open VS Code and install the Jenkinsfile extension.
After installing the extension. Make the new file i.e Jenkinsfile and type the pipeline word, you'll get like this and hit enter. You'll get the whole script of the Declarative pipeline and you can edit it accordingly.

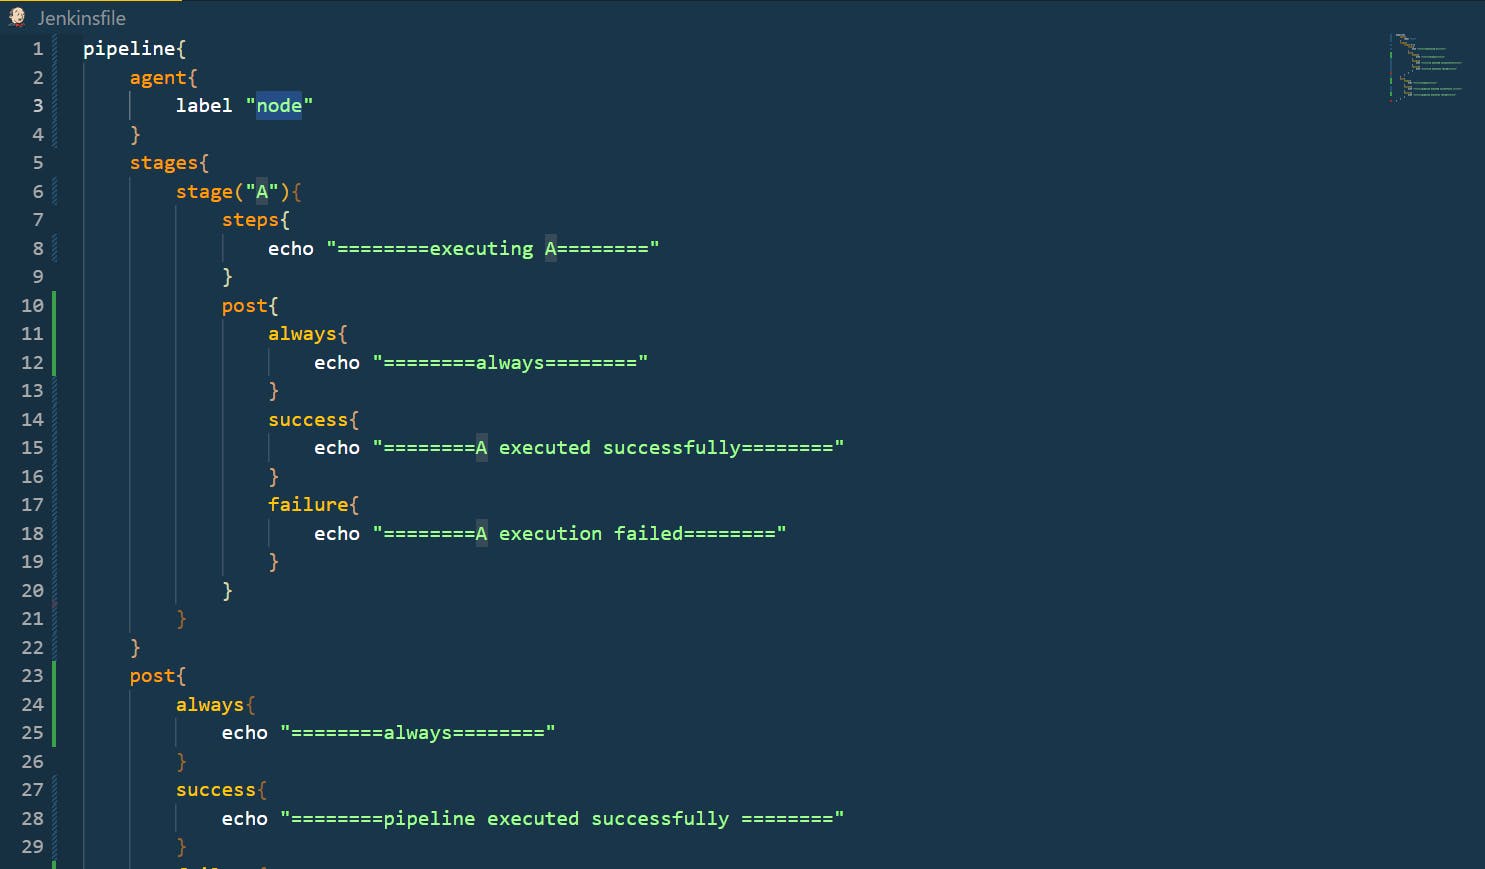
See, you don't have to remember the whole syntax of the pipeline just install the extension and see the magic.
Now, I have to write Jenkinsfile where I had to build the docker image and run the docker container.
  pipeline{
      agent any
      stages{
          stage("Code")
          {
              steps{
                  git 'https://github.com/amitmaurya07/Project_node-todo-cicd.git'
              }
          }
          stage("Build the Docker Image")
          {
              steps{
                  sh 'docker build -t django-react:1 .'
              }
          }
          stage("Pushing the Image to DockerHub")
          {
              steps{
                  withCredentials([string(credentialsId: 'amaurya07', variable: 'dockerhubpasswd')])
                  {
                      sh 'docker login -u amaurya07 -p ${dockerhubpasswd}'
                      sh 'docker push amaurya07/to-do-django-react:1'

                   }
              }
          }
          stage("Run the Container")
          {
              steps{
                  sh 'docker run -d --name django-container -p 8000:8000 django-react:1'
              }
          }
      }
  }
The declarative pipeline starts from the pipeline word that runs on any agent. It has 3 stages i.e Code, Build the Docker Image, and run the container and each stage has commands that will run.
In the first stage CODE under steps I provided the git URL. Now, remember one thing while writing Declarative Jenkins Pipeline you'll always take the help of Pipeline Syntax i.e directives that will give you the proper syntax of the step that you want to perform. As for Git URL, I had gone to the Pipeline Syntax (It is available in Configure at last in the pipeline section.)
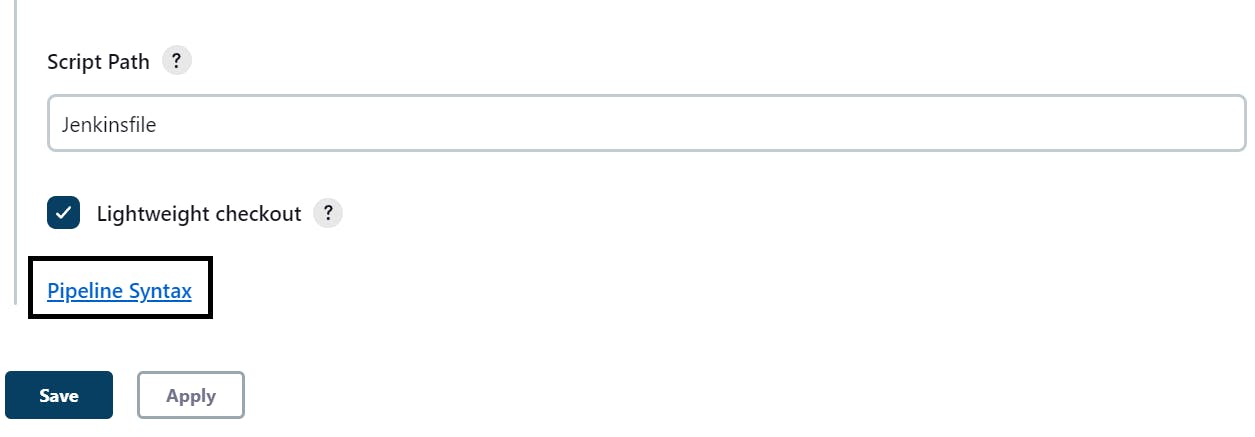
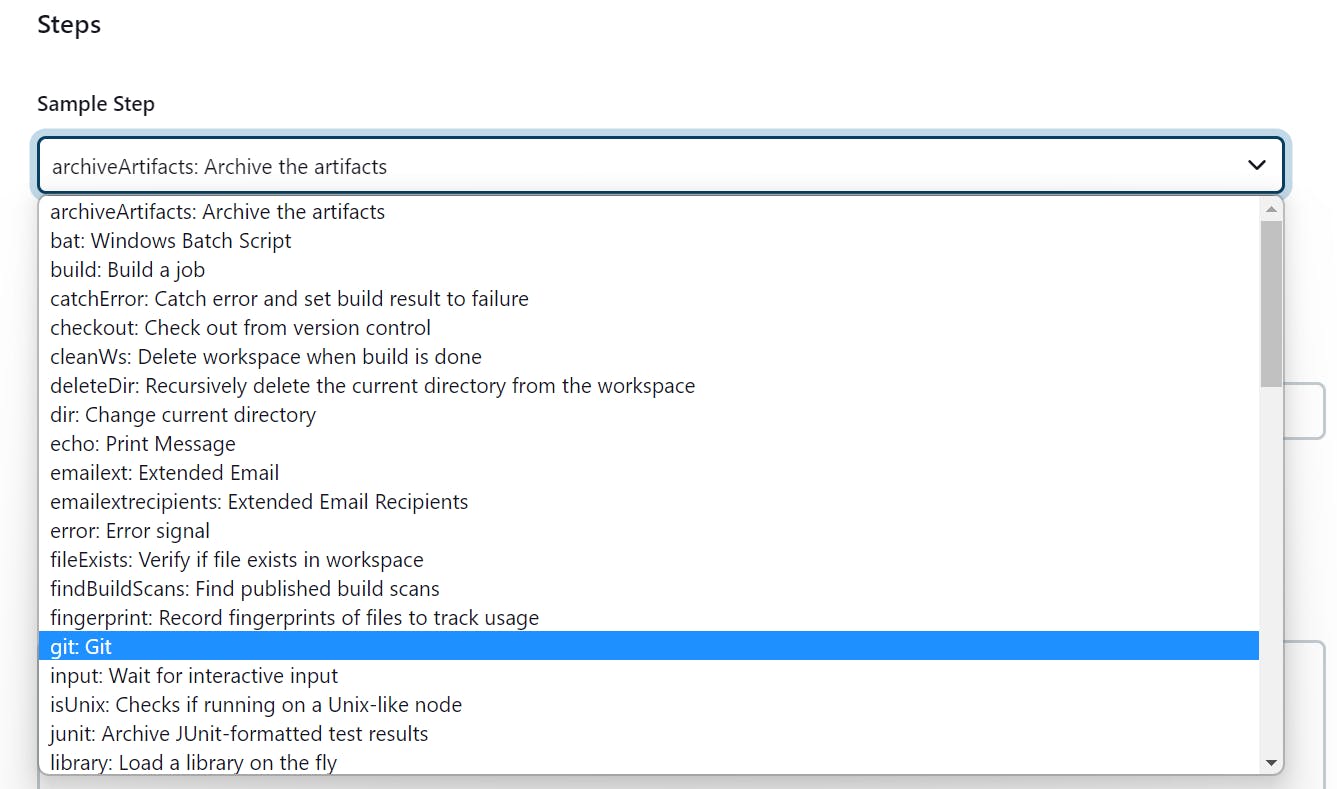
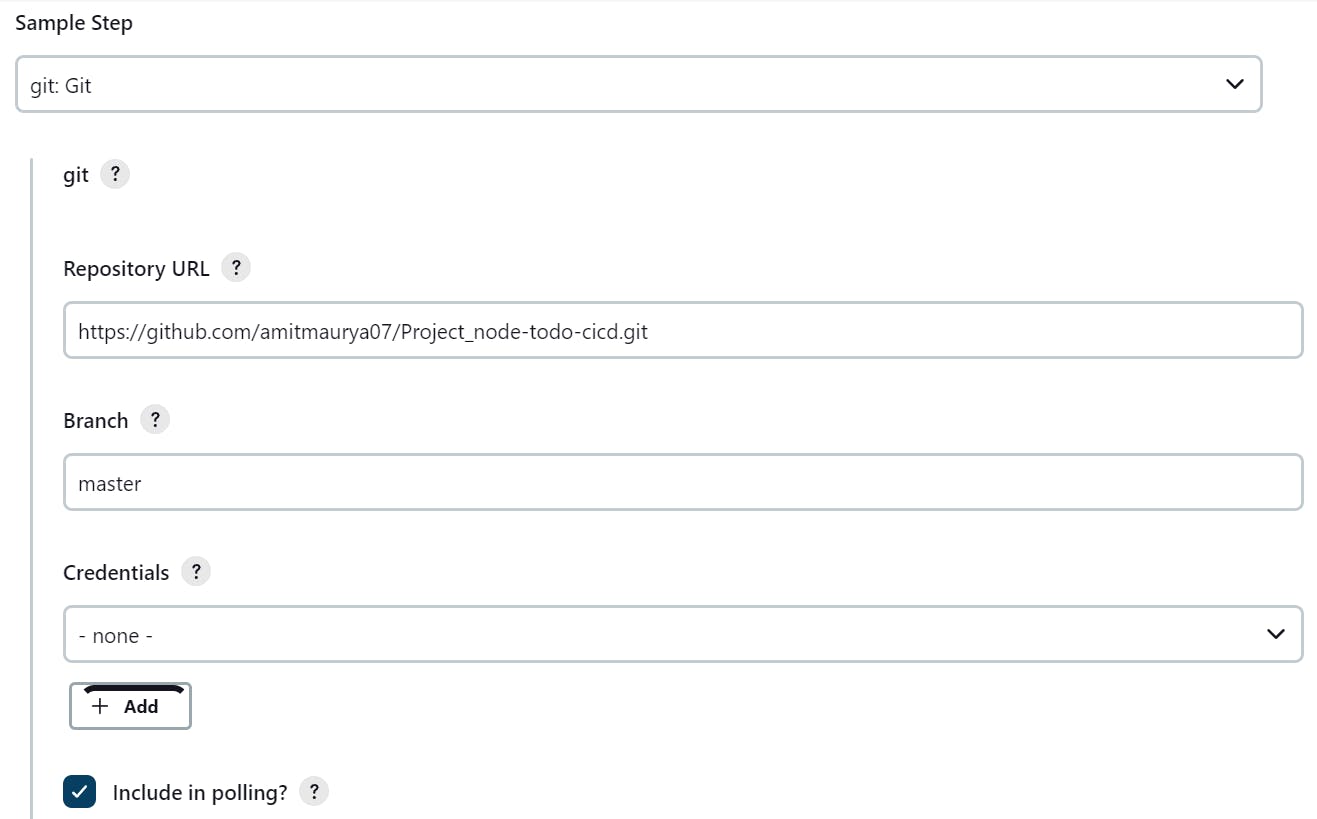
After clicking on Pipeline Syntax, under the snippet generator, you will see a sample step, under the sample step search for git and click on it. After clicking on git give the repo URL and branch specifier name.
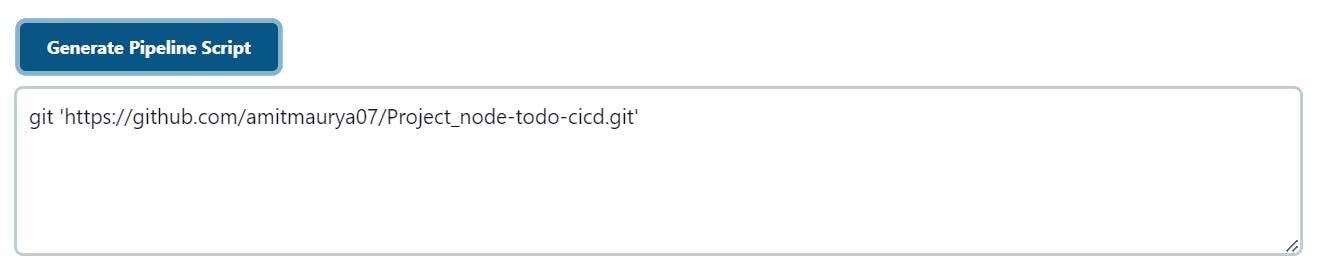
After this click on Generate Pipeline Script your script will be generated, just copy the script and paste it under Code Stage.
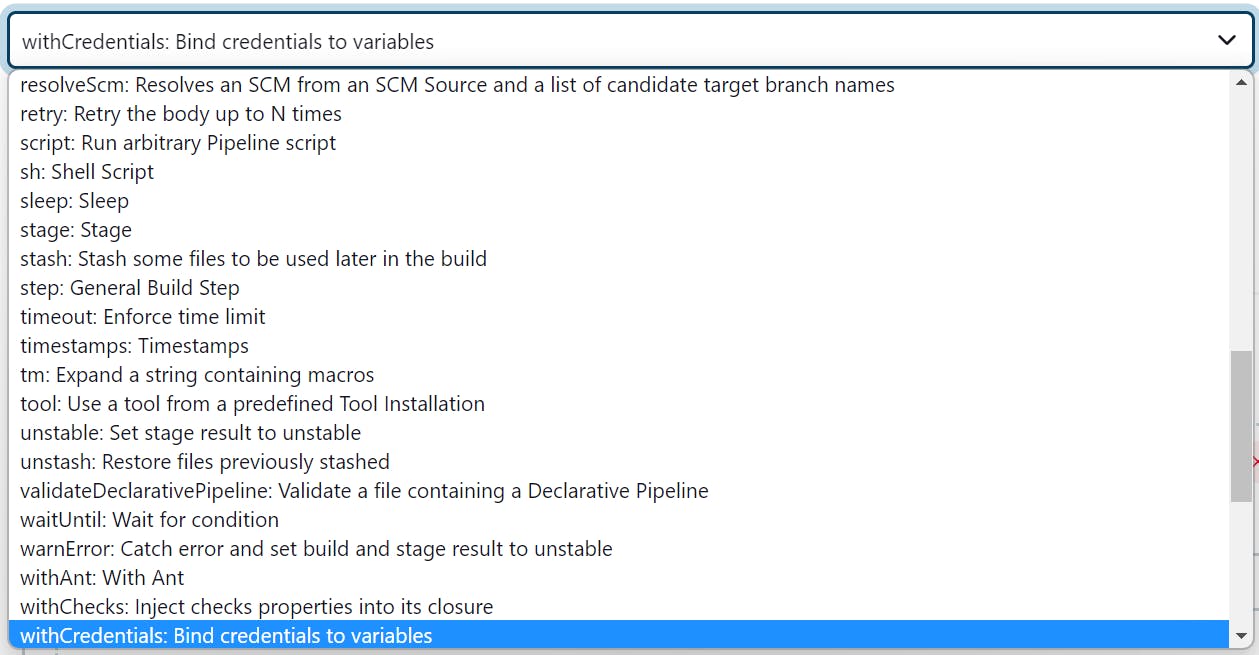
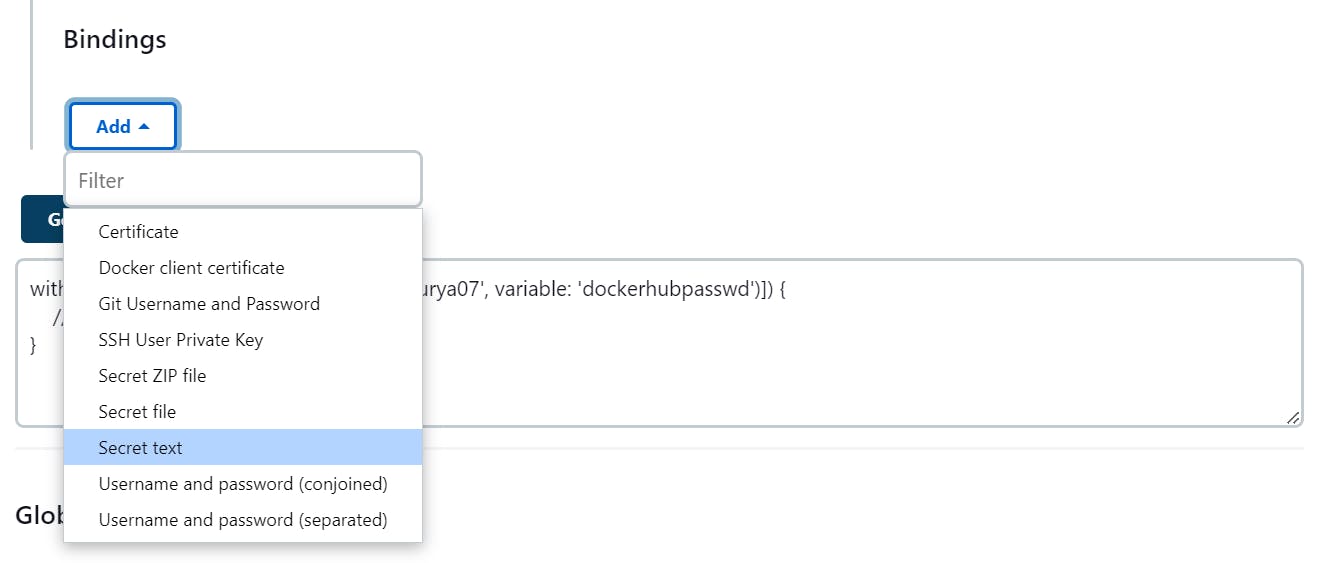
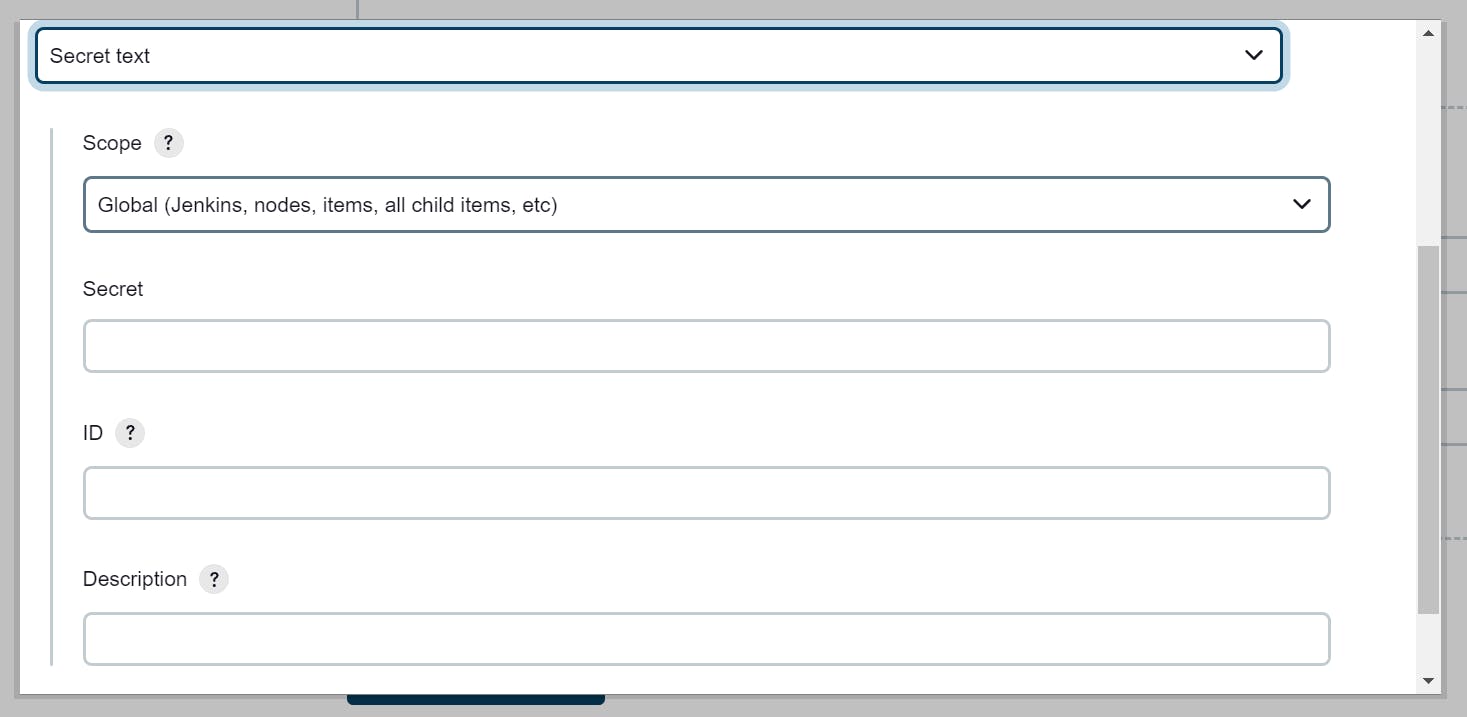
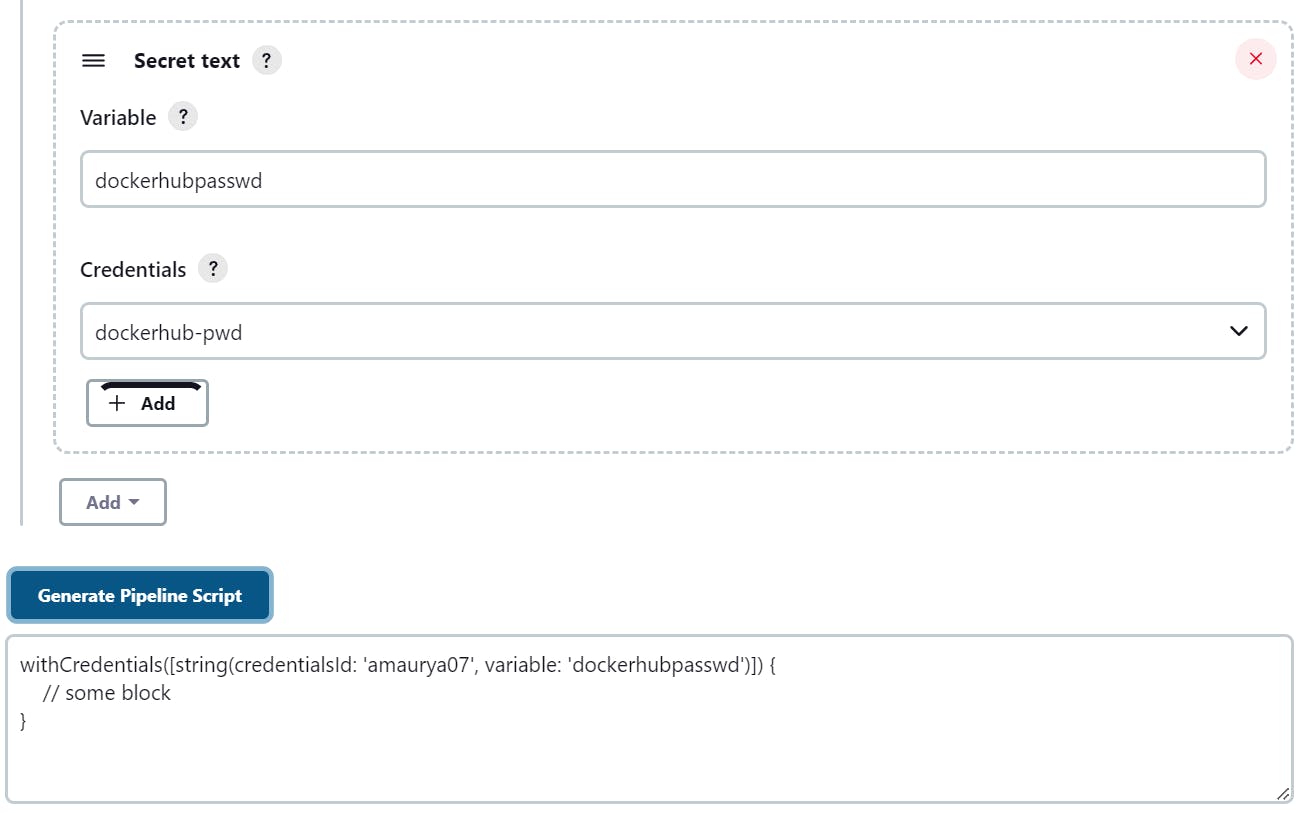
In the third stage, I am pushing the built image to DockerHub by passing the credentials of the DockerHub account. So, for this go to Pipeline Syntax under Sample Step and search for withCredentials click on it then it will ask then under bindings add secret text give Variable Name and it will ask for credentials, below credentials you will see Add option click on it, and then click on Jenkins. It will open the Add credentials page under kind select Secret text then under Secret give the DockerHub Password, give the DockerHub ID name under ID, and give any description name then at last click on Add. After this, it will directly add credentials of DockerHub then click on Generate Pipeline Script, copy the script and paste it under the Pushing the Image stage in Pipeline Script.
In the second and fourth stage docker image will be created and containers will be started running on the created image. sh is used to execute the commands. If you are familiar with docker commands then you got the docker build and docker run commands in the second and fourth stages.
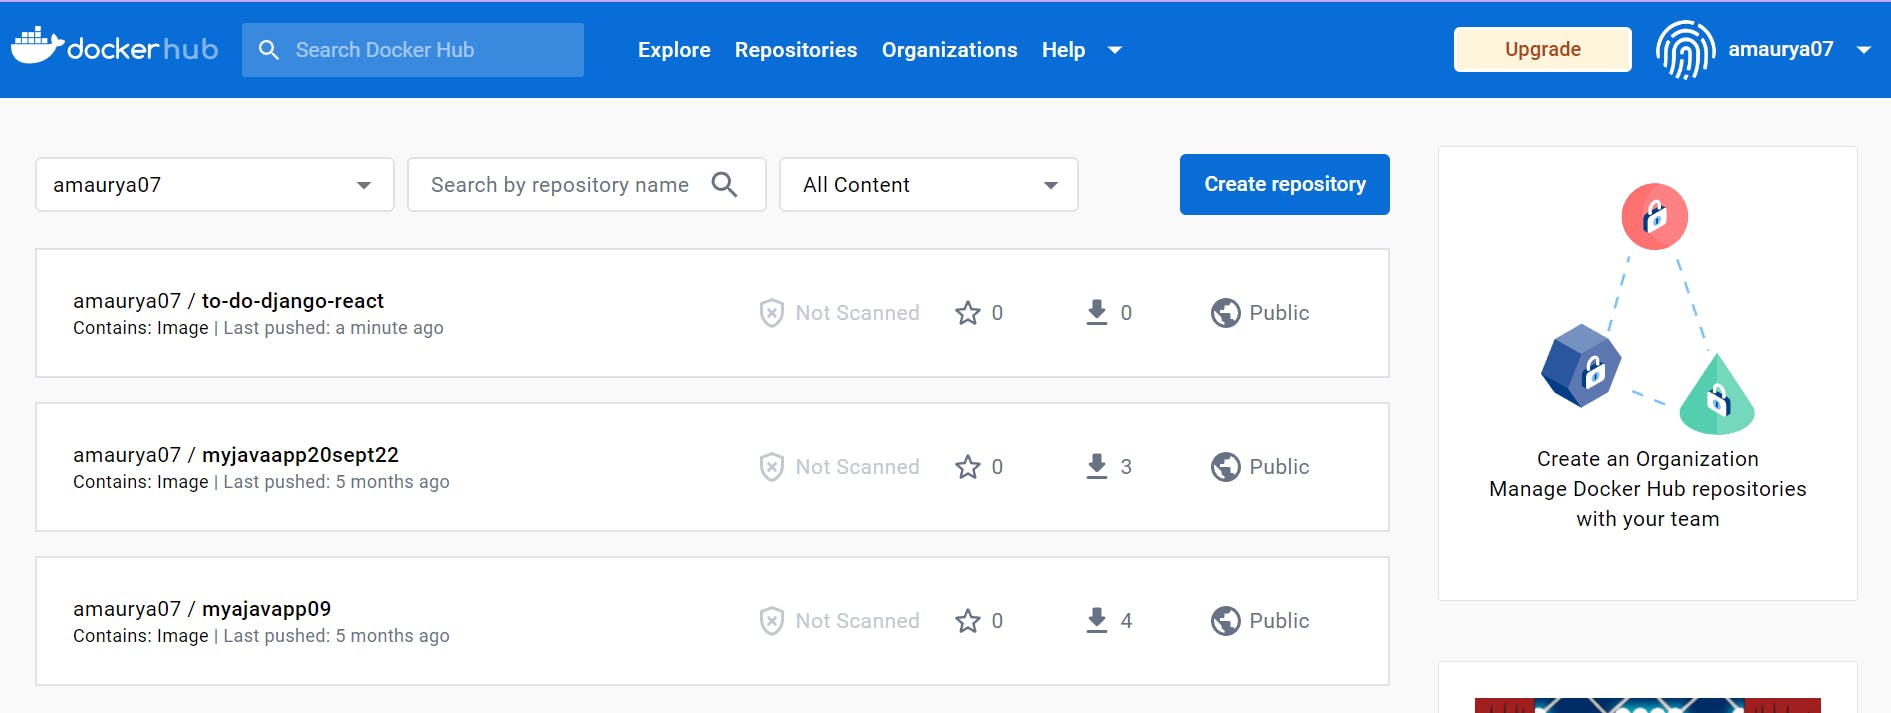
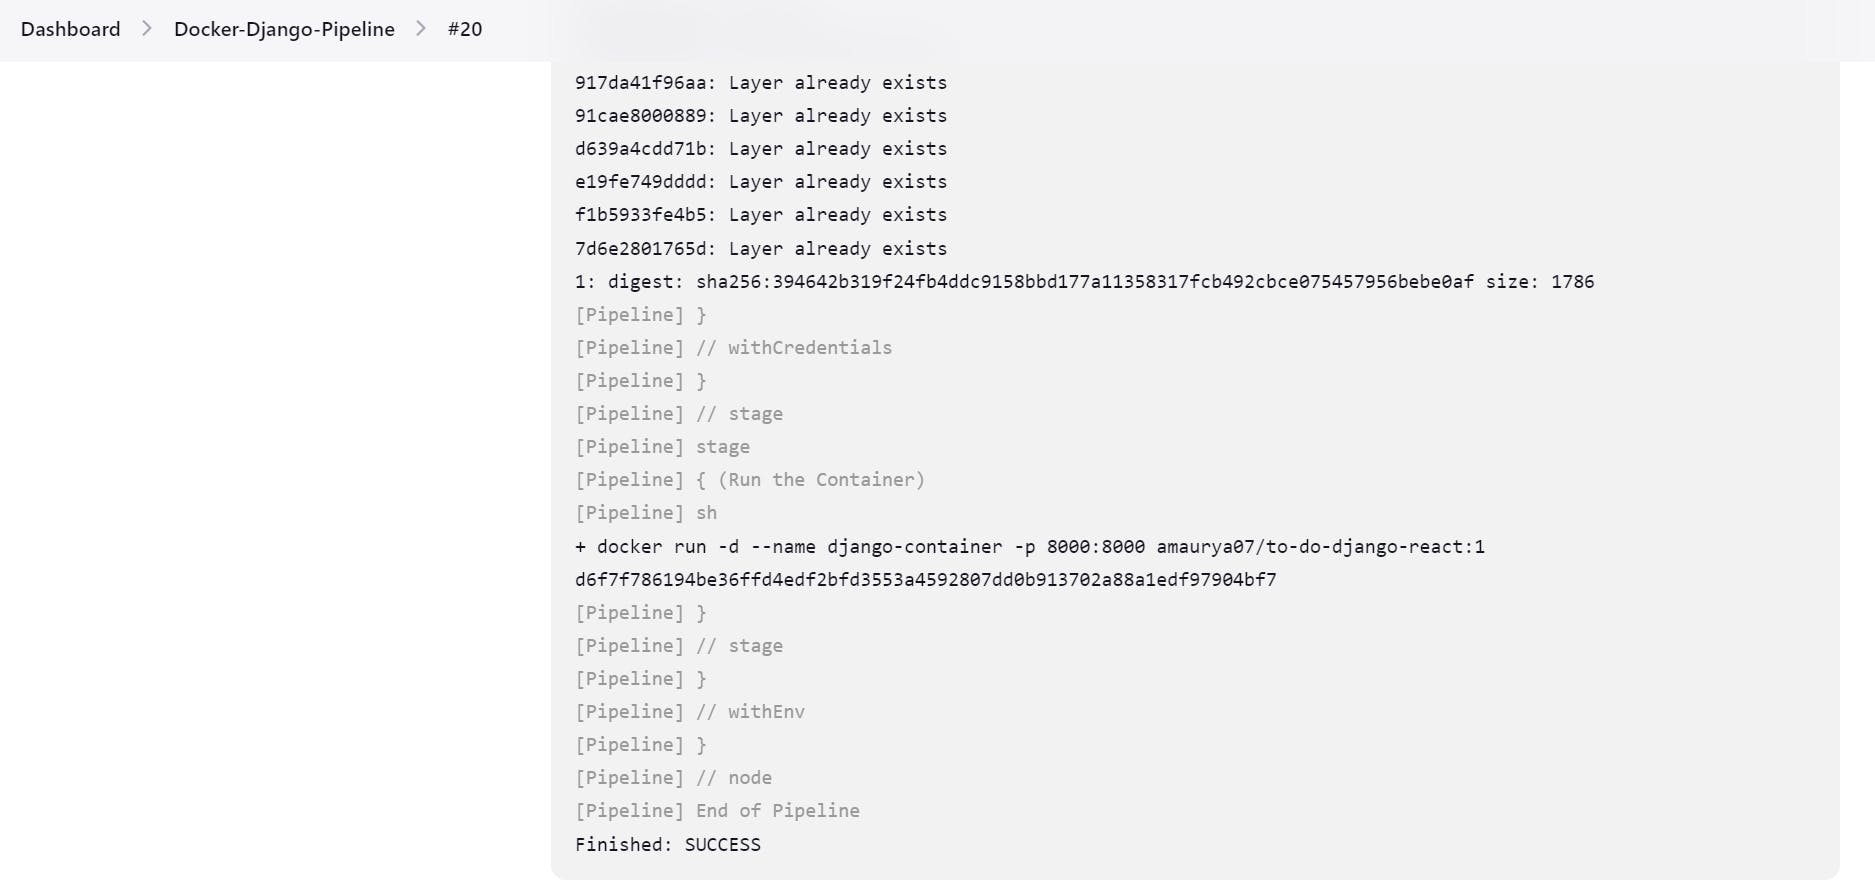
After this push it to the GitHub repo, the GitHub webhook will be triggered and it automatically starts creating the pipeline.
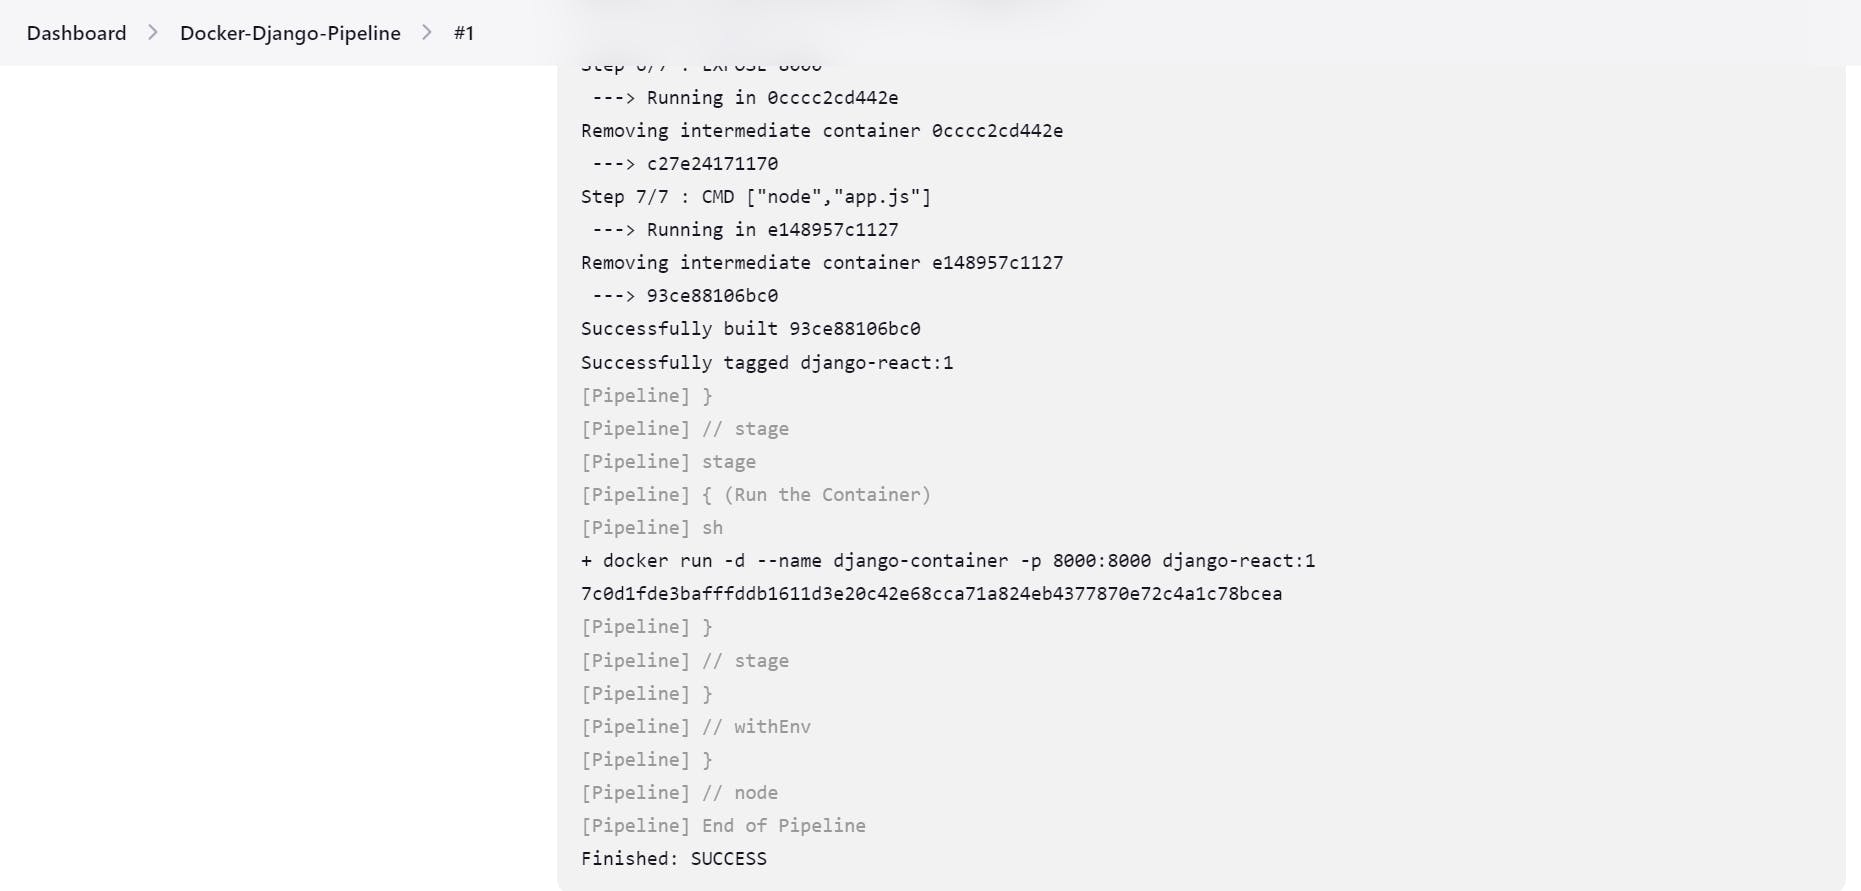
You can verify that the container is running on 8000 port.
Task 2:
- Create a docker-integrated Jenkins declarative pipeline using the
dockergroovy syntax inside the stage block.
Before this delete the created containers otherwise you'll face an error while creating the container because the container is already running on 8000 ports number.
Let's do some changes in Jenkinsfile for Task 2.
pipeline{
    agent any
    stages{
        stage("Code")
        {
            steps{
                git 'https://github.com/amitmaurya07/Project_node-todo-cicd.git'
            }
        }

        stage("Build the Docker Image")
        {
            agent{
                docker{
                    image 'amaurya07/to-do-django-react:1'
                    reuseNode true
                }
            }
                 steps{
                    echo 'Image has been built'
                 }
        }

        stage("Pushing the Image to DockerHub")
        {
            steps{
                withCredentials([string(credentialsId: 'amaurya07', variable: 'dockerhubpasswd')])
                {
                    sh 'docker login -u amaurya07 -p ${dockerhubpasswd}'
                    sh 'docker push amaurya07/to-do-django-react:1'
                 }
            }
        }

        stage("Run the Container")
        {
            steps{
                sh 'docker run -d --name django-container -p 8000:8000 amaurya07/to-do-django-react:1'
            }
        }
    }
}
In the second stage, I am pulling out the docker image from the DockerHub from the docker agent. reuseNode True is written so that no new workspace will be created.
See you will fail a lot while building the pipeline, and you will get a lot of errors but facing and solving the errors are a part of DevOps Engineers. You'll learn so many new things while solving the errors so don't be afraid.
So, that's it for today's Day 27 Task in which we learned about Declarative Jenkins Pipeline with Docker agent.
Follow me on Hashnode for more Linux and DevOps Blogs !!
You can connect with me on Twitter (amitmau07)
THANK YOU :)
HAPPY LEARNING :)